Safe Staged Releases: Controlled Exposure, Monitoring Checkpoints, and Clean Rollback
How operations teams use Percentage Rollouts to reduce blast radius, validate changes against real production signal, and make confident go/no-go decisions at every stage.

Every deployment is a bet. Staged rollouts let you size that bet. Start at 1%, watch what production tells you, and expand only when you're confident. If something looks wrong, pause or roll back — without a war room and without touching deployment pipelines.
Operations teams have absorbed a lot of pressure over the years to move faster. Smaller releases, more frequent deploys, continuous delivery — the theory is sound. But shipping more often only works if your recovery time when something goes wrong is short, and your blast radius when it does is small. Most teams solve half of that equation. They ship more often, but they still release to 100% of traffic at once. The blast radius never shrinks.
That's the gap that staged rollouts close. Not by slowing down your release cadence — but by decoupling how much of your user base sees a change from when that change is deployed. You can deploy on Thursday and release to 1% of traffic. Observe for a day. Then 5%. Then 10%. The change is in production, but your exposure is controlled.
This post walks through how Percentage Rollouts work in practice for an operations team: what the staged exposure model looks like, where you put your monitoring checkpoints, how pause and resume work, and how you make the final call to complete or roll back.
The Staged Exposure Model
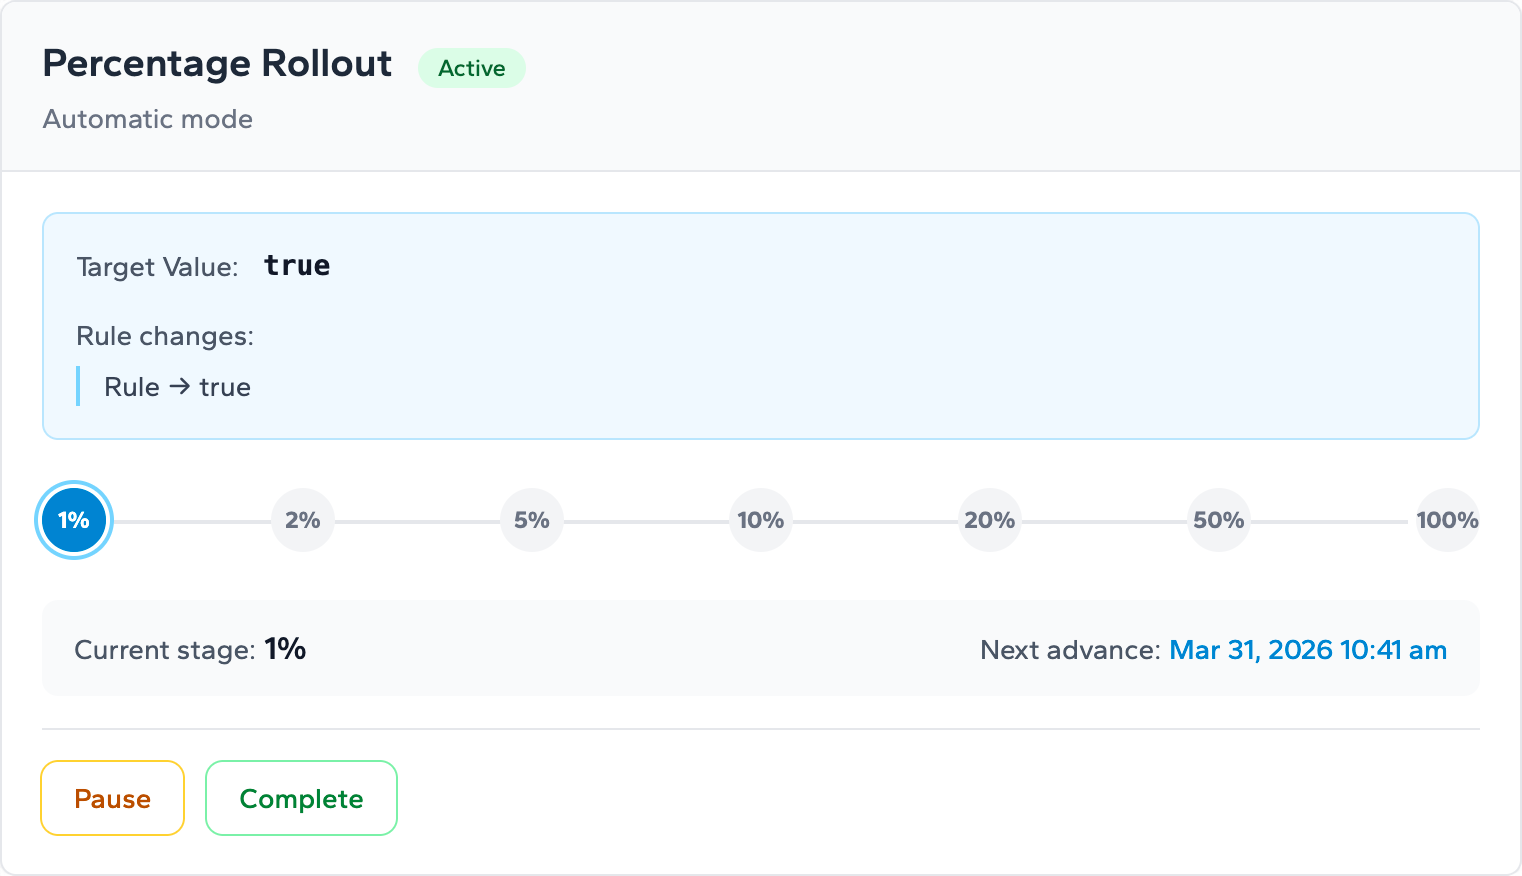
Percentage Rollouts in Zenmanage give you two modes for controlling staged exposure.
Manual rollouts put you directly in control. You set a percentage — anywhere from 1% to 100% — and Zenmanage delivers the new behavior to exactly that share of traffic. When you're ready to advance, you set the next percentage yourself. There's no timer, no automatic progression. You move at whatever pace the signals in your monitoring tell you to.
Automatic staged rollouts follow a predefined sequence, advancing one stage per day:
- Stage 1: 1% — smoke test with minimal blast radius
- Stage 2: 2% — confirm no immediate regressions
- Stage 3: 5% — first meaningful sample for error rates and latency
- Stage 4: 10% — broad enough for real performance signal
- Stage 5: 20% — significant exposure, watch for load-dependent issues
- Stage 6: 50% — majority exposure, final confidence check
- Stage 7: 100% — full rollout, old target automatically expired
In automatic mode, the daily cadence is built in. You're not trusting yourself to remember to come back and advance the rollout — the system does it. What you do have to do is watch your dashboards at each stage and pause the rollout if something looks off. That's the operational contract: the system advances, you observe and intervene.
One property worth understanding before you start: user assignment is deterministic. Each user lands in a consistent bucket based on their identity. That means a user who sees the new behavior at 5% will keep seeing it at 10%, 20%, and beyond. There's no flickering between the old and new experience as the rollout progresses.
A Realistic Example: Releasing a Payment Flow Rewrite
Staged rollouts are most useful when the change you're releasing has real blast radius potential. Consider a team shipping a rewrite of their payment processing flow. The new code is tested, staging looks clean, and the team is confident — but a regression in the payment path is a very bad day. This is exactly the scenario staged rollouts were designed for.
Before You Start
Before configuring the rollout, make sure you have clear answers to three questions: What metrics tell you the release is healthy? What thresholds trigger a pause? Who has the authority to pause, resume, or roll back? If you don't have those answers written down before you start, reference the Rollout Checklist — it walks you through pre-rollout readiness in exactly this order.
For a payment flow, the signal list typically looks like this:
- Payment success rate (baseline and delta)
- Checkout error rate in application logs
- P95 and P99 latency on the payment endpoint
- Declined transaction rate (to catch logic regressions, not just errors)
- Support ticket volume related to payment failures
You want those dashboards open and visible before you start advancing stages.
Stage 1: 1% — Smoke Test
The rollout starts at 1%. At this stage, you're not looking for statistical significance — you're looking for obvious breaks. Does the new payment path throw errors? Does it return unexpected status codes? Are there any immediate latency spikes that weren't present in staging?
At 1%, a problem affects almost no one. But it shows up in your logs clearly enough that you can catch it fast. Hold here for at least 24 hours and confirm none of your threshold conditions are triggered.
Stages 2–4: 2%, 5%, 10% — Building Signal
As the rollout advances through these stages, your sample size grows enough to start drawing real conclusions. At 5%, you can see error rate trends. At 10%, your latency percentiles are meaningful. This is where the monitoring becomes substantive rather than just sanity-checking.
The questions you're answering at each stage:
- Is the payment success rate holding within acceptable range of the control group?
- Are there any new error types in application logs that weren't present before?
- Is latency tracking with the baseline, or has something introduced overhead?
- Any support escalations involving users in the rollout cohort?
If you're using automatic mode, the system advances each day. Your job is to check in each morning, review the signal from the previous stage, and decide whether to let it continue or pause.
Stage 5–6: 20%, 50% — High Confidence Zone
By 20%, you have meaningful production coverage. Load-dependent issues that only manifest under real traffic conditions will show up here — things that staging environments simply cannot reproduce reliably. This is often where subtle performance regressions surface.
At 50%, you've crossed the majority of your user base. Any remaining concerns at this stage are usually about specific user segments or edge cases rather than broad regression. If your metrics are clean at 50%, the final 100% is typically a confidence call rather than a discovery exercise.
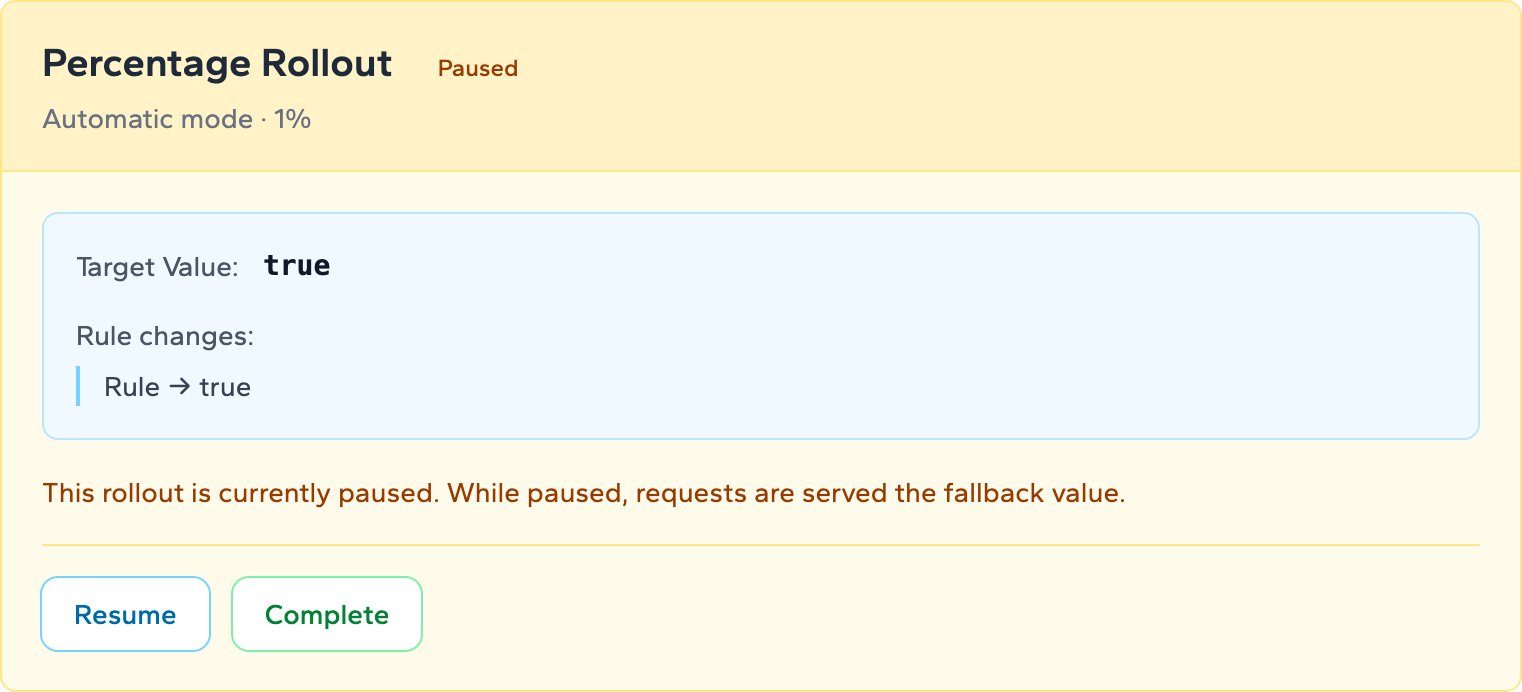
When to Pause: Reading the Signal
Pausing a rollout is not a failure — it's the system working as designed. Pause when your monitoring tells you something is wrong, not after you've already let it run to a higher percentage.
The trigger should be defined before you start. Common pause criteria for a payment flow:
- Payment success rate drops more than 0.5 percentage points from the control group
- Checkout error rate increases by more than 2x over the pre-rollout baseline
- P95 latency on the payment endpoint increases by more than 20%
- Any new error type appearing in logs with more than isolated frequency
When you pause in Zenmanage, the rollout freezes at its current percentage. The automatic daily advancement timer stops. Users already in the rollout cohort keep their current experience — they don't flip back. No new users are added. The blast radius is frozen exactly where it is while your team investigates.
The Resume and Rollback Decision
Once you've paused, you have two paths: resume or roll back. The choice depends on what you found.
Resuming After a Fix
If your investigation identifies the root cause and your team ships a fix, resume the rollout from where it was paused. Zenmanage restarts from the current stage — not from the beginning. In automatic mode, the daily advancement clock resets from the point of resumption. You don't lose your progress; you just add time.
After resuming, watch the same metrics you paused on, but with tighter attention for the next 24–48 hours. A resume is a signal that your fix is in production, not confirmation that the problem is gone.
Rolling Back
If the issue can't be quickly resolved — or if the signal is bad enough that keeping even a small percentage of users on the new path is unacceptable — roll back. Rolling back reverts the flag target to the previous value for all users in the rollout cohort. Everyone returns to the old behavior immediately. There is no deployment required.
This is the core advantage of decoupling deployment from release. The code stays deployed. The rollout state reverts. You regroup, fix the root cause, and start a new rollout when you're ready. The recovery is measured in minutes, not hours.
For a structured decision framework — including recommended monitoring durations, go/no-go criteria, and rollout percentage recommendations by risk level — see the Canary Release Playbook.
Completing the Rollout
When the rollout reaches 100% and your metrics confirm the release is healthy, you complete it. Completing a rollout promotes the new value to be the flag's standard target for all traffic. The rollout state is cleared. The flag goes back to behaving like a normal feature flag — now serving the new behavior to everyone by default.
In automatic mode, this happens automatically when the final stage reaches 100% and advances. In manual mode, you trigger completion explicitly. Either way, the result is the same: a clean, fully promoted release with a full audit trail of the staged rollout that preceded it.
Building Rollout Readiness Into Your Process
A staged rollout is only as useful as the preparation behind it. The failure mode operations teams hit most often isn't a bad release — it's starting a rollout without knowing what metrics to watch or what thresholds should trigger action. By the time something goes wrong, the team is improvising instead of executing a plan.
Two resources are worth building into your pre-release workflow:
- The Rollout Checklist covers everything you need to confirm before starting a rollout — flag configuration, monitoring coverage, rollback ownership, and communication readiness.
- The Launch Readiness Checklist takes a broader view — feature completeness, documentation, support team awareness, and post-launch monitoring — for releases that go beyond a single flag change.
Running through either checklist before you configure the rollout turns a pre-launch scramble into a routine confirmation step.
Why This Model Reduces Release Risk
The operational value of staged rollouts comes down to a few concrete properties:
- Contained blast radius. A bug that reaches 1% of users is a contained incident. A bug that reaches 100% of users is a crisis. Staged rollouts give you the ability to catch the former before it becomes the latter.
- Real production signal. Staging environments don't reproduce real user behavior, real load, or real edge cases with fidelity. A 1% production rollout gives you signal that no amount of staging coverage can match.
- Fast recovery without a deployment. Rolling back a flag takes seconds. Rolling back a deployment takes longer and often involves coordination across multiple teams. Decoupling these two operations changes your recovery time profile significantly.
- Visible, auditable release history. Each stage advancement, pause, and completion event is tracked. Operations and engineering leadership have a clear record of how the release progressed — or why it was stopped.
- Reduced release ceremony. When you can roll back without a deployment, the stakes for any individual release drop. That means less coordination overhead, fewer approval gates, and a faster overall release cadence.
See Percentage Rollouts in action
Percentage Rollouts are available on every Zenmanage plan. Start a free trial and run your first staged rollout today — no infrastructure changes required.