Guides and playbooks
Progressive Rollouts Playbook
Step-by-step playbook for the full rollout lifecycle — configure, monitor, expand, and complete — covering both Manual and Automatic modes.
Prerequisites
- A flag created and published to the target environment
- ZENMANAGE_SERVER_KEY exported in your server environment, or VITE_ZENMANAGE_CLIENT_KEY in your front-end build
- Baseline error and latency metrics captured so you have something to compare against during the rollout
Choose Manual or Automatic mode
Before you save your first configuration, decide which mode fits the risk profile of the change.
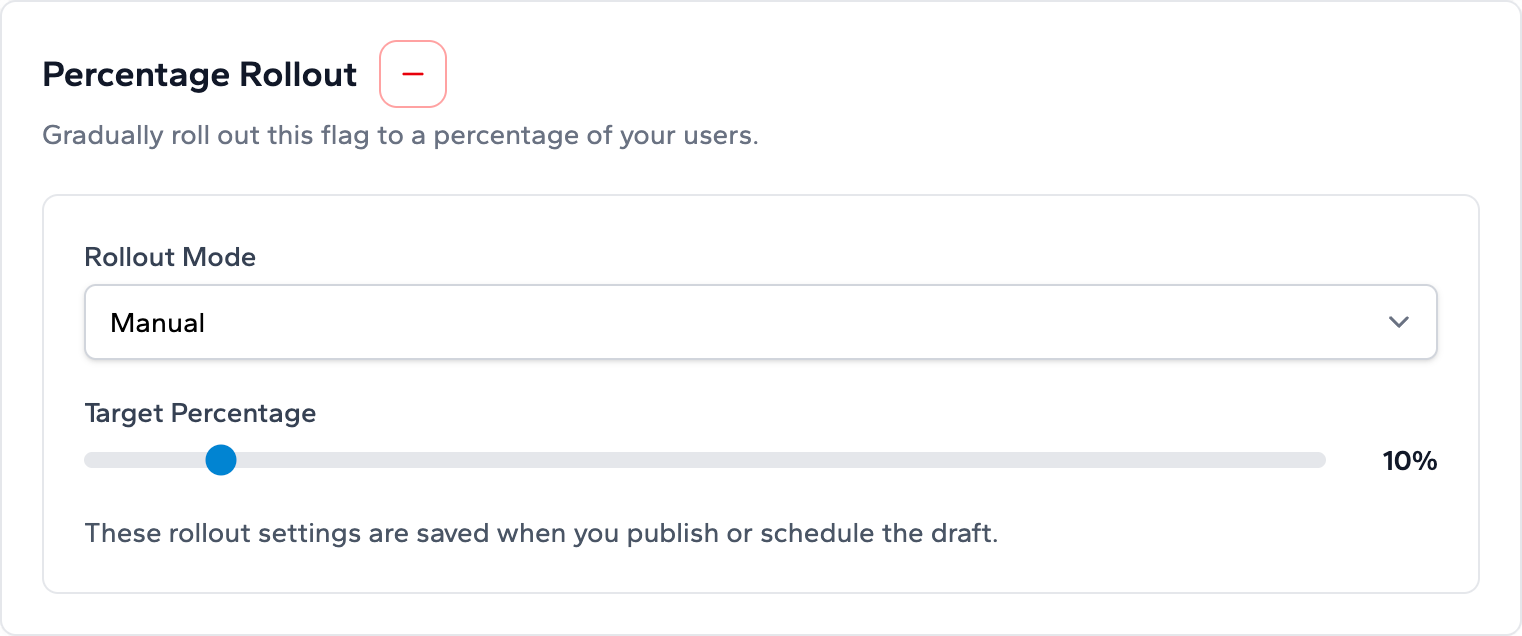
Manual mode
You advance the percentage yourself. Use Manual when the feature needs a human decision at each stage — for example, when you need to read a dashboard, run a query, or hold a team sync before proceeding. Manual gives you maximum control and is the right default when the rollout touches payment flows, data migrations, or any path where a machine advancing the schedule would be inappropriate.
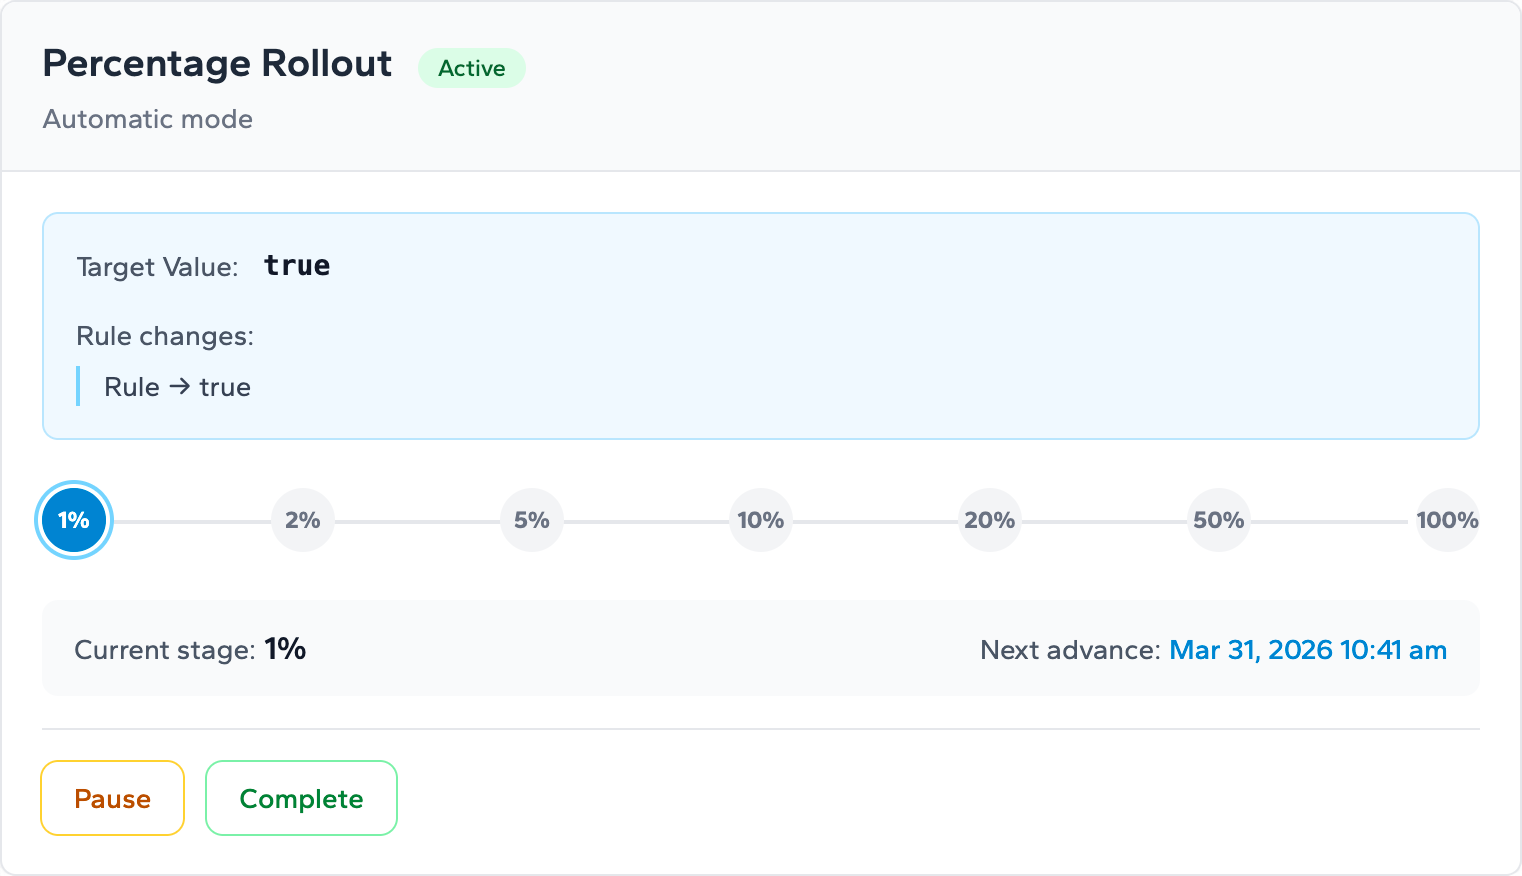
Automatic mode
Zenmanage advances the percentage on the schedule you configure. Use Automatic for low-risk UX changes, internal tooling, or infrastructure improvements where you trust the rollout to proceed overnight or over a weekend without manual intervention. You can still pause, override, or complete early at any time.
When in doubt, start in Manual mode and switch to Automatic after the first stage confirms the change is stable.
Phase 1 — Configure
- 1. Set the rollout target. Choose the flag value to roll out — typically the value that enables the new behavior. Users who are not yet in the rollout receive the current published default.
- 2. Set the initial percentage. For high-risk changes, start at 1–5 %. For internal or low-risk changes, starting at 10–20 % is common. There is no universal right answer; the goal is a canary window small enough to catch a problem before it reaches most users.
- 3. Choose your mode. Select Manual or Automatic using the guide above.
- 4. Configure stages (Automatic only). Define the percentage and duration for each stage. A seven-stage schedule is a common starting point: 2 % → 5 % → 10 % → 20 % → 40 % → 70 % → 100 %, with a soak period at each stage long enough to detect regressions in your monitoring.
- 5. Save and activate. The rollout moves to Active state. Zenmanage immediately begins serving the rollout value to the configured percentage of users in that environment.
Keep a safe path in code
How deterministic bucketing works
When a rollout is active, Zenmanage assigns each user a position in a virtual bucket by hashing their context identifier — typically the user ID — against the flag key. This produces a stable number between 0 and 100 that is the same every time for the same user.
If the rollout is at 10 %, only users whose bucket number falls in the lowest 10 % of the range receive the new value. When you advance to 20 %, the same users still receive the new value — and the next 10 % of the bucket range is added on top. Users do not flip in and out of the rollout as the percentage increases.
This matters for incident response: if a bug is reported while the rollout is active, you can identify affected users by knowing the current rollout percentage and which identifiers fall inside it. It also matters for UX during expansion: a user who qualified at 10 % stays qualified when you move to 20 %, because the next bucket range is added instead of reshuffling everyone already in the rollout.
Changing the context identifier changes the bucket
Phase 2 — Monitor
The most important period of any rollout is the first stage. Watch the following signals for at least one full traffic cycle — typically 24–48 hours for consumer products — before advancing.
- Error rate: compare the error rate during the rollout window against the baseline you captured before launching. A spike of more than one or two standard deviations is the strongest signal to pause.
- Latency: look at p95 and p99 latency, not just average. The new code path may be slower only for a subset of requests that are invisible in average metrics.
- Business events: monitor conversion, activation, or transaction events if the flag touches a user journey. A drop in conversion that correlates with the rollout start date is a signal even if error rates look clean.
- Support volume: watch for a spike in support tickets or in-app feedback. User-visible bugs rarely show up only in server metrics.
For Automatic mode, also confirm that the progress indicator is advancing on the expected schedule.
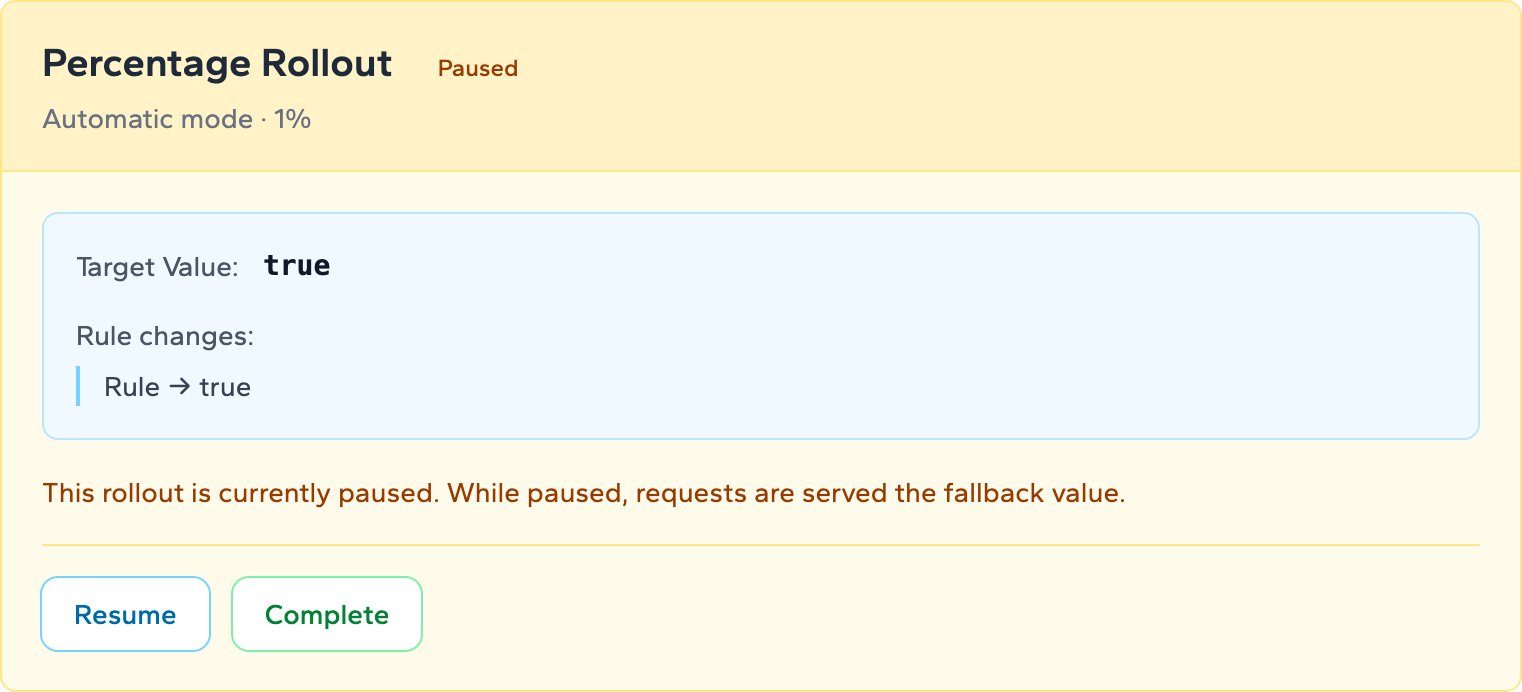
When to pause
Pausing stops the rollout and serves the previous target rules to everyone in that environment. The rollout percentage is preserved so you can resume later, but while paused the rollout itself is not serving traffic. Use Pause when:
- Metrics are trending in the wrong direction but you are not yet certain enough to roll back completely.
- An unrelated incident is active and you want to stop introducing additional variables.
- A planned maintenance window is approaching and you prefer a clean baseline before it.
- You are waiting for a team member or stakeholder review that cannot happen until the next business day.
Resume when the blocking concern is resolved. The rollout continues from where it paused — it does not restart the stage timer in Automatic mode.
Pause is not rollback
Phase 3 — Expand
Once a stage looks stable, advance the percentage.
Manual expansion
Use the percentage slider to move to the next stage. There is no prescribed cadence — you set the pace. After each advance, resume monitoring before moving further. Double the percentage at each step as a common heuristic: 5 % → 10 % → 20 % → 40 % → 80 % → 100 %.
Automatic expansion
Zenmanage advances through the stages you defined at configuration time. You do not need to take any action unless you want to pause, skip a stage, or complete early. Check the progress indicator periodically to confirm the schedule is running as expected.
In both modes, the soak time at each stage is more important than how quickly you advance. A rollout that spends 24 hours at 10 % before moving to 20 % is more reliable than one that steps from 1 % to 100 % in an hour.
Phase 4 — Complete
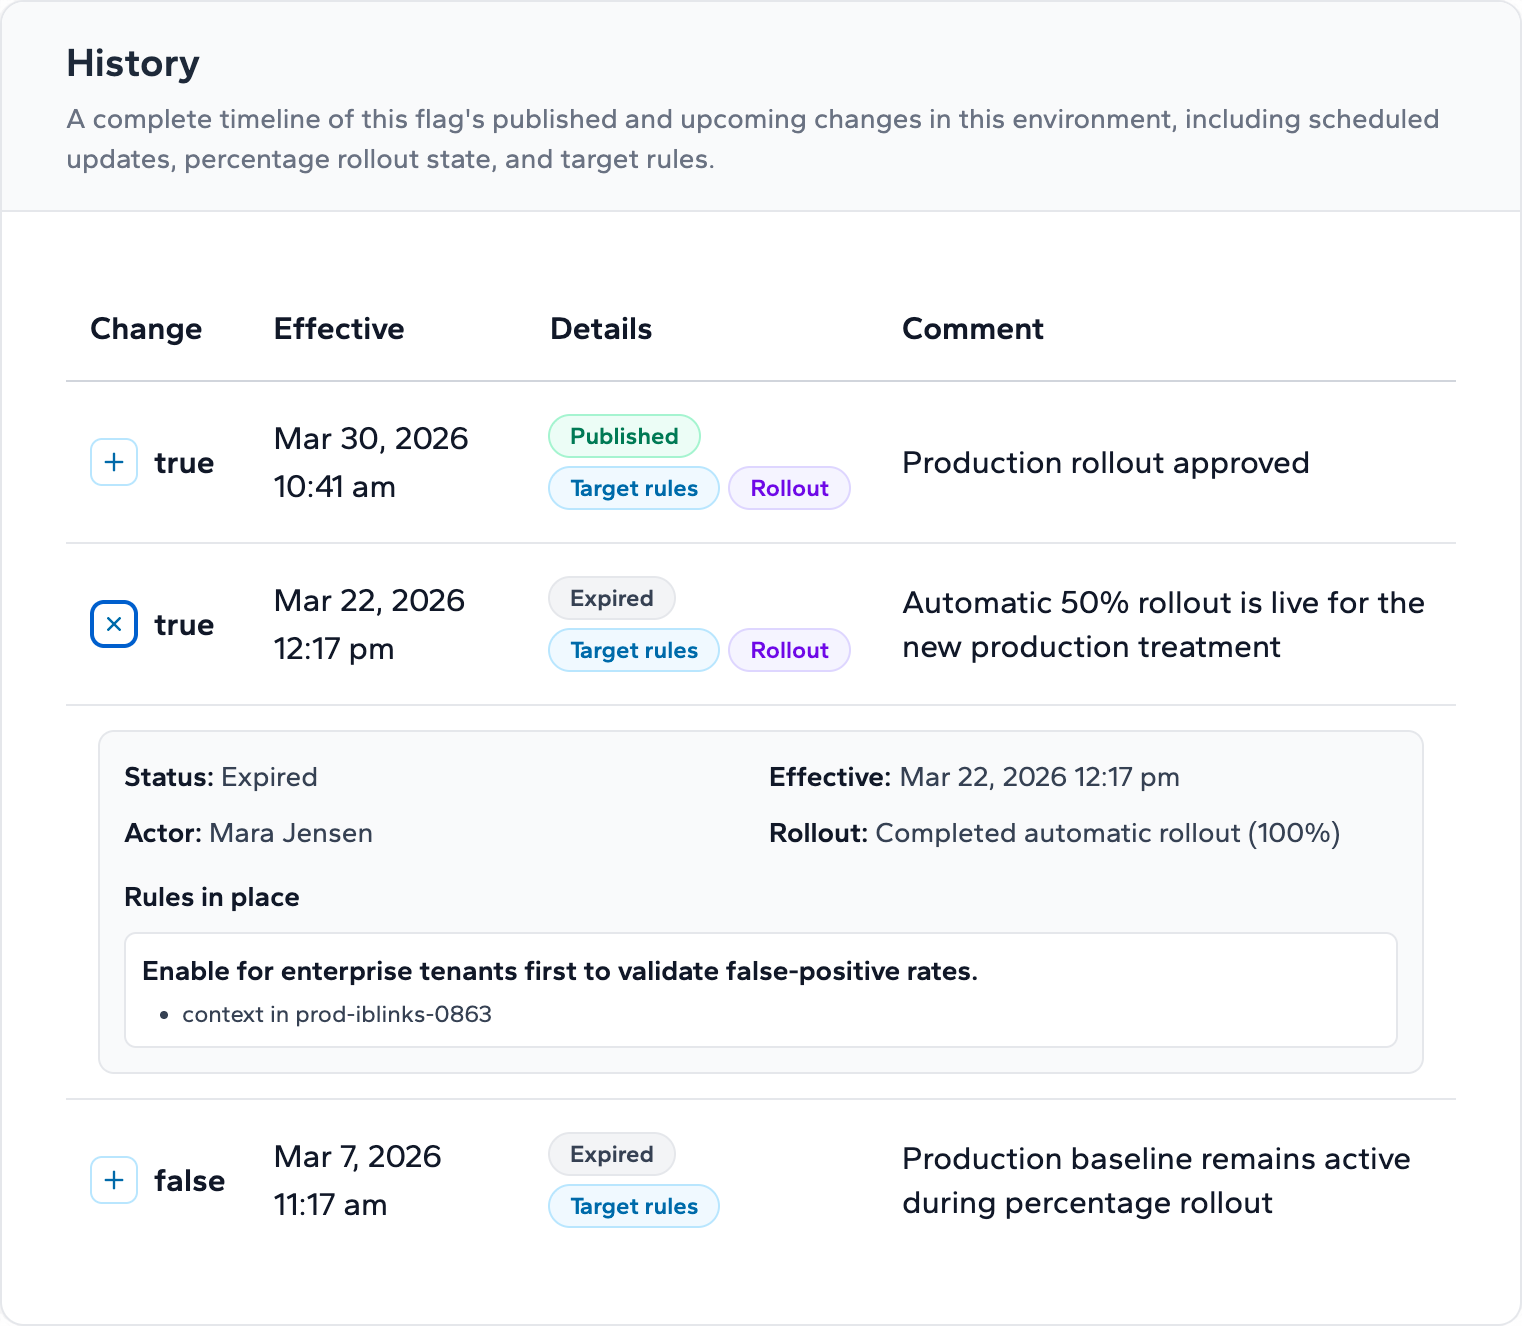
A rollout is complete when the new value should become the permanent behavior for all users. Completing the rollout promotes the rollout value to the flag's published default and removes the rollout configuration.
- 1. Verify 100 % or complete early. If you are at 100 % and metrics look good, use the Complete action. In Automatic mode you can also complete early at any stage if you are confident the change is safe for all users.
- 2. Remove the flag from code. After completion, plan a code cleanup ticket. The inline default in your application is now redundant — the flag value is the published target. Leaving flags in code indefinitely creates the technical debt the governance checklist is designed to prevent.
- 3. Archive the flag. If the flag will never be needed again, archive it. This keeps your flag list clean and prevents accidental reuse of an old key.
Completing early
Once a rollout is complete, Zenmanage records that transition in the flag history so you can review when the rollout finished, who completed it, and how the flag moved from rollout state back to the normal published target flow.
Quick-reference decision matrix
| Situation | Recommended action |
|---|---|
| Error rate spikes but cause is unknown | Pause immediately; investigate before proceeding |
| Error rate spike is confirmed unrelated | Resume; document the correlation in incident notes |
| Metric regression clearly caused by the rollout | Use kill switch to revert; do not just reduce percentage |
| All metrics healthy at current stage | Advance to next stage after soak period |
| Automatic rollout advancing too fast | Pause; reconfigure stage durations; resume |
| Early data is strongly positive | Complete early to reduce time on split code paths |
| Feature at 100 % and stable for > 1 week | Complete rollout; schedule code and flag cleanup |
Related resources
- Rollout governance checklist — naming, ownership, and lifecycle hygiene practices to apply before and after every rollout.
- Canary Release Playbook — step-by-step canary workflow with go/no-go decision criteria, recommended percentages, and monitoring duration.
- Canary releases use case — how progressive rollouts power a canary release strategy in practice.
- Kill switch and incident rollback guide — the fastest path from incident detection to mitigation without a redeploy.
- Analytics and reporting guide — how to use the last evaluation date and missing default value reports to verify rollout health.
- Launch Readiness Checklist — end-to-end launch preparation covering documentation, support readiness, communication, and post-launch monitoring.
Ready to run your first rollout? Start your free trial and create a flag in minutes.
Next step
Take the next integration step in your own stack.
Start with the quickstart that matches your runtime, then return to the reference pages when you need exact request and payload details.